Why Professional Roof Installation Matters for Connecticut and New York Homeowners
Have you watched a roofing crew pull up to your neighbor’s house and wondered how long those trucks, dumpsters, and equipment will dominate the street? Most Connecticut and New York homeowners dread the thought of torn-up yards, tracked-in mud, and weeks of construction chaos disrupting their daily routines. The good news is that professional roof installation typically wraps up in 1-2 weeks total, with actual on-site work lasting just 3-5 days for standard residential properties.
Northeast-specific challenges like frost lines reaching 42 inches deep, ice dam prevention requirements, and wetland setbacks can extend timelines, but certified contractors follow a structured sequence from permit applications to final cleanup that keeps disruptions manageable. Understanding what happens at each phase helps you prepare your property, protect your landscaping, and know exactly when your driveway will be accessible again.
Whether you’re dealing with aging shingles or planning ahead for that inevitable replacement, knowing the realistic timeline and process can turn an anxiety-inducing project into a smooth experience.
Key Takeaways
- Expect 1-2 Week Total Project Timelines in Connecticut and New York: Most residential re-roofs complete in 3-5 days of on-site work, with preparation and permitting adding 7-14 days beforehand. Frost protection requirements, wetland reviews, or complex architectural features may extend schedules.
- Full Tear-Off Protects Your Home’s Structure: Complete removal of old materials exposes the roof deck for thorough inspection and repairs, while ice and water shield installation prevents Northeast freeze-thaw damage that causes leaks.
- Early Preparation Prevents Costly Surprises: Building permits, material staging coordination, and zoning verification identify potential issues like slope setbacks or wetland buffers before work begins, avoiding mid-project delays.
- Proper Installation Seals Your Building Envelope: Multiple protective layers including underlayment, metal flashing, and properly nailed shingles work together to handle wind uplift and provide 24-inch overhang protection against water infiltration.
- Local Permits Vary Between Connecticut and New York: Connecticut requires permits for replacements covering more than 25% of the roof, while approval processes typically take 7-14 days depending on your municipality.
- Professional Cleanup Comes Standard: Daily debris removal, magnetic nail sweeps, and final property walkthroughs protect your yard and ensure you can resume normal activities immediately after completion.
Understanding the Roof Installation Process in Connecticut and New York
Professional roof replacements in the Northeast follow a predictable sequence that accounts for regional weather patterns, local building codes, and property-specific challenges. Unlike quick patch jobs that leave underlying problems unaddressed, comprehensive installations tackle everything from frost protection to steep pitch safety in a logical progression. Connecticut and New York homes often feature complex roof geometries with multiple valleys, dormers, and varying slopes that require additional planning beyond basic shingle removal and replacement. Understanding how professional crews adapt to these regional factors helps homeowners set realistic expectations and prepare their properties appropriately.
Regional Challenges Shape Installation Approaches
Northeast properties face unique obstacles that influence project timelines and methods. Heavy snow loads require reinforced structural support, while mature tree canopies limit crane access and material staging options on many residential lots. Spite laws in some municipalities restrict where contractors can temporarily block neighbor access, requiring creative equipment placement. Properties near regulated wetlands need erosion control measures and silt fencing to prevent runoff during tear-off phases, potentially adding approval steps.
Steep pitches common on Colonial and Cape Cod architecture demand specialized scaffolding and safety equipment that takes longer to install but prevents accidents. Corner lots with sightline requirements may need advance notice to local planning departments before staging materials near intersections. Multi-story homes often require terrain cranes for material hoisting when roof heights exceed safe ladder limits, adding equipment rental time to project schedules. Professional contractors account for these variables during initial site visits, developing customized plans that address your property’s specific layout and regulatory requirements.
Typical Installation Timelines for Connecticut and New York Properties
Baseline national averages for roof installation rarely apply directly to Northeast homes due to weather delays, deep frost considerations, and more rigorous code enforcement. Standard 1,500 square foot gable roofs that might complete in 1-3 days nationally typically take 3-7 days of on-site work in Connecticut and New York when you factor in permit coordination and inspection scheduling. The complete timeline from contract signing to final cleanup generally spans 1-2 weeks, with most homeowners experiencing 5-7 days of active construction presence on their property.
How Roof Size and Complexity Affect Duration
Simple asphalt shingle replacements on ranch-style homes with straightforward roof lines represent the fastest scenario. A standard 1,500 to 2,000 square foot roof with basic geometry can often complete tear-off and installation in 3-4 consecutive days when weather cooperates. Adding architectural complexity like hip roofs, multiple valleys, or dormers extends work by 1-2 days as crews carefully fit flashing and trim each junction point. Larger homes exceeding 3,000 square feet of roof surface may require 5-7 days even with favorable conditions simply due to the volume of material handling involved.
Permit acquisition and material ordering consume the first 1-2 weeks before physical work begins. Delivery trucks typically arrive the morning of Day 1, positioning shingle bundles, underlayment rolls, and flashing materials for efficient workflow. Tear-off begins immediately after staging, with most residential roofs stripped to the deck within 6-10 hours depending on how many layers need removal. Deck inspection and repair work happens same-day or next morning, followed by ice and water shield application in critical areas. Field shingle installation occupies Days 2-4 for average homes, with ridge caps, vents, and trim completing the sequence.
Daily Breakdown of a Standard Installation
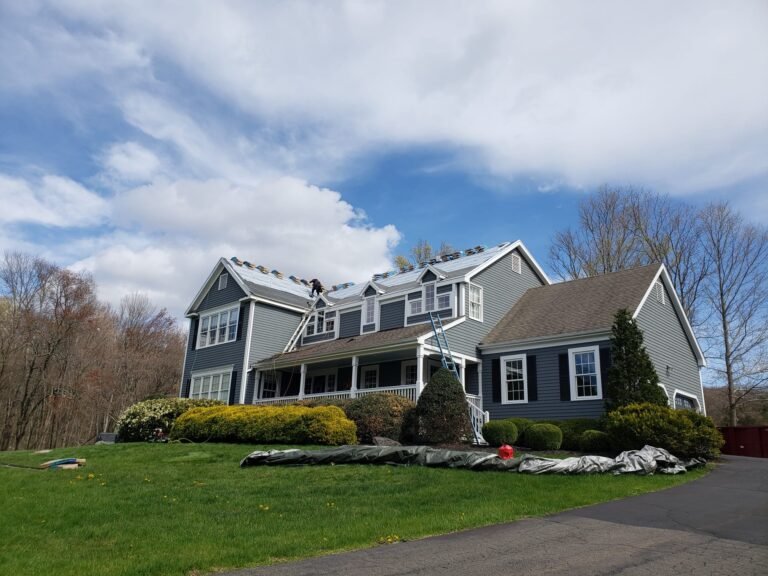
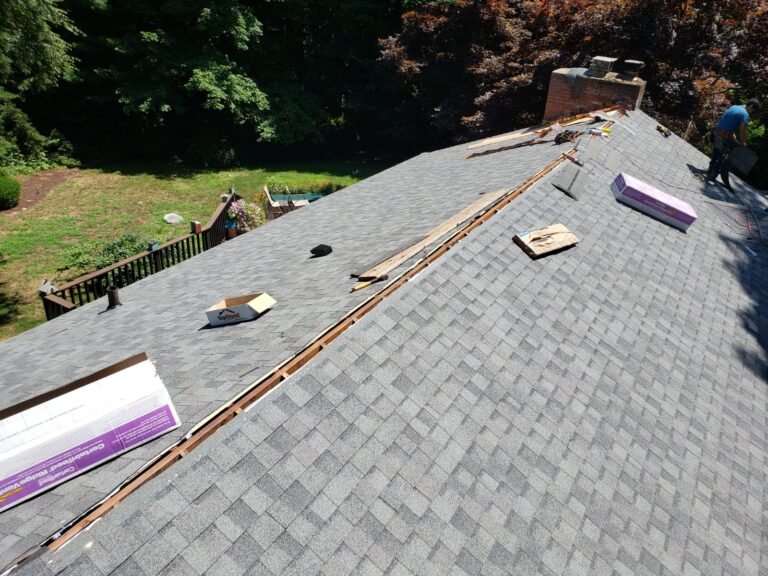
Day 1 focuses on material delivery, site protection setup, and tear-off execution. Crews arrive early to spread tarps over landscaping, position dumpsters, and create equipment staging areas before beginning demolition. Old shingles, felt paper, and damaged flashing get stripped away, exposing the roof deck for evaluation. Any soft spots, rot, or structural issues discovered at this stage get documented and repaired before moving forward.
Day 2 starts with deck repairs using plywood or OSB panels to replace compromised sections. Synthetic underlayment gets rolled across the entire surface, creating a secondary water barrier independent of the finish shingles. Ice and water shield receives special attention along eaves, valleys, and around penetrations like chimneys and plumbing vents, extending at least 24 inches inside exterior walls per code requirements.
Days 3-4 involve field shingle installation starting from the eaves and working upward in staggered patterns. Metal step flashing gets interwoven with shingles along wall junctions, while valley flashing receives either woven or cut treatments depending on roof design. Each shingle receives the proper number of nails positioned to resist wind uplift common in Northeast storm systems. Day 5 wraps up ridge cap installation, attic ventilation placement, and final trim work before the inspection walkthrough. Daily cleanup removes debris from gutters and grounds, with magnetic sweeps collecting stray nails from driveways and lawns.
Core Steps in Every Professional Roof Installation
Quality installations follow the same fundamental sequence regardless of material choice or architectural style. These phases build upon each other to create a complete weather-resistant system that protects your home for decades. Skipping or rushing any stage compromises long-term performance and may void manufacturer warranties. Professional contractors allocate appropriate time to each step rather than cutting corners to meet artificial deadlines.
Comprehensive Site Preparation
Work begins before the first shingle gets removed. Contractors conduct utility scans if solar panels or electrical conduits cross roof surfaces, marking locations to prevent accidental damage. Gutters get cleared of debris that could interfere with proper water flow during and after installation. Zoning setbacks from property lines get verified to confirm material staging areas comply with local ordinances, particularly important on narrow urban lots.
Ground-level protection includes moving patio furniture, covering air conditioning units, and relocating vehicles from driveways and garages. Tarps protect foundation plantings from falling debris, while plywood sheets create walkways that prevent equipment from rutting lawns. Inside your home, contractors may request access to attics for ventilation inspections and to interior spaces directly below roof valleys where leak risks concentrate.
Thorough Tear-Off and Deck Evaluation
Complete removal of existing roof layers reveals the true condition of structural decking. Leaving old shingles in place might save time initially but prevents detection of rot, insect damage, or previous leak problems that compromise new roof longevity. Most residential properties have one or two existing layers, though older homes sometimes harbor three or more that must all come off.
Deck inspection identifies soft spots requiring plywood replacement before proceeding. Rafters get checked for proper spacing and adequate strength to handle snow loads. Any gaps between deck panels get addressed since even small openings allow wind-driven rain penetration. Synthetic underlayment then covers the entire deck as a temporary weather barrier, though professional crews avoid leaving roofs open overnight whenever possible.
Layered Protection System Installation
Modern roof systems rely on multiple defensive barriers working together. Ice and water shield self-sealing membrane gets applied first along vulnerable areas including eaves extending at least 24 inches inside exterior walls, around all penetrations, and through valleys. This rubberized material creates watertight seals around nails that standard felt paper cannot match.
Metal flashing comes next at wall intersections, around chimneys, and along roof-to-valley transitions. Step flashing gets woven with each shingle course up vertical walls, while continuous valley flashing handles concentrated water flow. Drip edge along rakes and eaves directs water into gutters while protecting fascia boards from moisture exposure.
Starter strips along eaves provide the first shingle course with proper seal integrity and wind resistance. Field shingles then get installed in staggered patterns specified by manufacturers, with each fastener positioned to provide maximum hold without over-penetrating. Proper nailing patterns resist wind uplift forces common during Northeast storms while preventing blow-offs.
Additional Considerations for Complex Northeast Installations
Standard procedures get modified for challenging architectural features and regulatory requirements common in Connecticut and New York. These adaptations add time and cost but prevent problems that compromise roof performance. Homeowners should expect contractors to identify these factors during initial estimates rather than discovering them mid-project as unwelcome surprises.
Managing Steep Slopes and Challenging Access
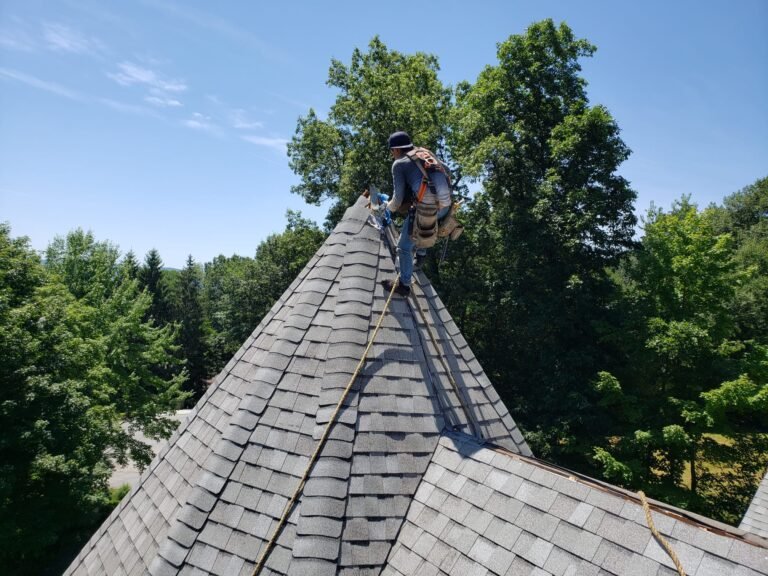
Roof pitches steeper than 6:12 require specialized safety equipment including scaffolding, roof brackets, and harness systems that take hours to install properly. The additional setup time protects workers while allowing them to maintain quality installation standards on precarious surfaces. Materials also become harder to position on steep slopes, slowing shingle placement compared to low-slope applications.
Multiple valleys where roof planes intersect concentrate water flow and create leak-prone junctions requiring extra flashing attention. Complex valley treatments using diverter flashing or cricket installations add 1-3 days to standard timelines. Properties with numerous dormers, skylights, or roof penetrations multiply these challenges since each feature demands individual weatherproofing.
Environmental Protection Requirements
Properties located within regulated wetland buffers of 50-100 feet face additional approval steps before work can begin. Erosion control measures including silt fencing and sediment barriers must be installed before tear-off begins to prevent debris and particulates from washing into protected areas. Local environmental commissions review site plans and may require modifications to staging areas or debris handling procedures.
Stormwater runoff concerns extend beyond just wetlands. Many municipalities now regulate construction site drainage to prevent sediment from clogging storm sewers or impacting neighboring properties. Contractors may need to establish temporary retention areas or use specific cleanup protocols that add daily maintenance requirements throughout the project duration.
Final Details and Property Restoration
Ridge ventilation installation completes the attic airflow system, requiring coordination with soffit vents to create proper air circulation. Cap shingles along ridges and hips receive extra attention since wind exposure at these locations exceeds field areas. Each penetration including plumbing vents, exhaust fans, and furnace flues gets properly sealed and flashed.
Yard restoration begins during daily cleanup and concludes after final inspection. Magnetic sweeps collect stray nails from driveways, lawns, and landscaped areas where they could puncture tires or injure children and pets. Staging areas get raked and reseeded if necessary, though most professional operations use protective measures that prevent significant turf damage. Gutters receive final clearing of construction debris before crews depart.
Navigating Permits and Regulations in Connecticut and New York
Local building codes govern roof replacement projects to protect homeowner safety and property values. Connecticut requires permits for replacements affecting more than 25% of roof covering, while New York regulations vary by municipality with some requiring permits for any structural work. Understanding these requirements prevents project delays and potential fines from unpermitted work discovered during property sales or insurance claims.
Building Permit Application Process
Permit applications typically require roof plans showing dimensions, slope calculations, and material specifications. Building departments review submissions for code compliance before issuing approvals, a process taking 7-14 days in most Connecticut and New York communities. Fees range from $100-300 depending on project scope and local fee schedules. Some municipalities require contractors to pull permits, while others allow homeowners to serve as their own general contractor.
Zoning compliance gets verified as part of permit review. Setback requirements affect temporary material staging, while height restrictions may limit certain roof designs. Corner properties sometimes face additional scrutiny regarding sightline obstructions during construction. Historic district homes may need architectural review board approval before permits get issued, adding weeks to timelines.
Inspection Requirements and Timing
Mid-project inspections often occur after tear-off to verify deck condition and proper underlayment installation before shingles cover the work. Final inspections check completed roof systems for code compliance including proper ventilation, flashing details, and manufacturer installation requirements. Scheduling inspections requires advance notice, typically 24-48 hours, though busy construction seasons can extend wait times.
Failed inspections require correction work and re-inspection fees that delay project completion. Common issues include insufficient ventilation, improper flashing, or missing ice and water shield in required locations. Professional contractors familiar with local inspector preferences rarely face these delays since they build to standards that exceed minimum requirements.
Preparing Your Property for Installation Success
Homeowners play an active role in facilitating smooth project execution. Advance preparation minimizes disruptions while protecting your belongings and landscaping from construction impacts. Most tasks take just a few hours but make significant differences in how efficiently crews can work and how quickly your property returns to normal afterward.
Pre-Construction Property Tasks
Clear items from garage spaces if your overhead door provides the most convenient material access. Move vehicles to street parking or alternate driveways at least one day before scheduled start dates. Trim tree branches overhanging the roof by at least 3 feet to prevent interference with equipment and provide clear working areas. Remove items hanging on exterior walls including decorative shutters, light fixtures, or house numbers that could get damaged by falling debris.
Inside your home, relocate items stored in attics since contractors may need access throughout the project. Consider moving vehicles from attached garages since vibrations from tear-off work can trigger car alarms repeatedly. Notify work-from-home household members about expected noise levels during peak demolition phases so they can arrange alternate locations for important calls or meetings.
Managing Daily Disruptions
Expect significant noise during tear-off and installation, particularly from early morning through late afternoon. Shingle removal generates loud scraping and hammering, while nail guns create sharp reports during installation. Most contractors work 7 a.m. to 5 p.m., respecting neighborhood quiet hours. Dust and debris inevitably escape protective measures, so plan to wipe down outdoor furniture and sweep porches daily.
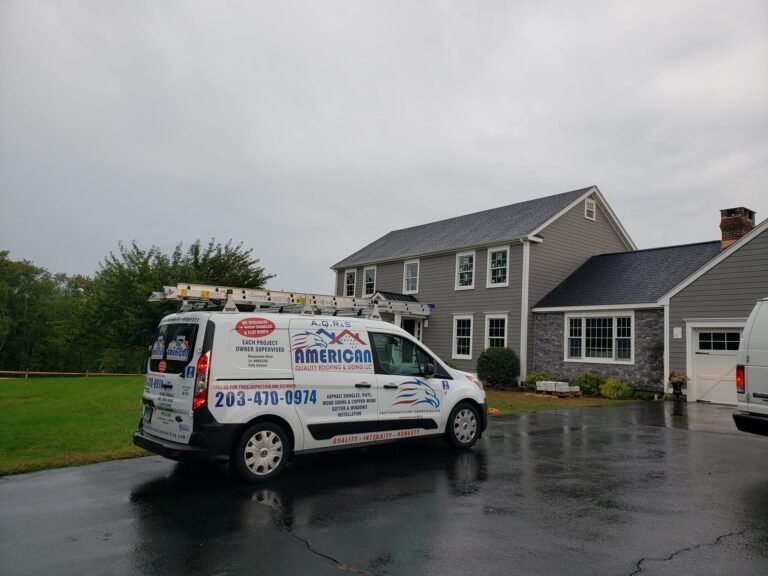
Driveway access gets restricted during material deliveries and dumpster positioning. Contractors provide advance notice about when you’ll need to move vehicles, typically just for the first day or two. Pets should remain indoors since open gates, unfamiliar workers, and construction noise create escape and stress risks. Young children benefit from extra supervision since construction sites attract curious attention despite safety fencing.
Seasonal Timing Considerations
Spring through fall provides optimal weather windows for Northeast roof installations, avoiding temperature extremes that affect adhesive seal downs. Summer’s predictable weather patterns reduce rain delays, though material staging in direct sun makes afternoon work hot. Fall completion before snow season offers peace of mind but requires early scheduling since contractors book solid by September.
Winter installations remain possible during mild spells but carry higher risk of weather delays and cold-weather material limitations. Some shingle manufacturers restrict installation below certain temperatures to prevent seal failure. Early spring work can encounter lingering frost in shaded areas that delays morning starts until temperatures rise. Professional contractors monitor weather forecasts closely and adjust schedules proactively to minimize wasted mobilization days.
Process Comparison: Standard vs. Complex Installations
| Installation Phase | Simple Gable Roof (1,500 sq ft) | Complex Hip/Valley Roof (2,500+ sq ft) |
|---|---|---|
| Permit & Preparation | 7-10 days for local approval | 10-14 days with wetland review |
| Material Delivery & Staging | 2-4 hours morning of Day 1 | 4-6 hours, may require crane rental |
| Tear-Off & Deck Prep | 1 day complete removal | 1-2 days with structural repairs |
| Underlayment & Ice Shield | 4-6 hours application | 1 full day for complex valleys |
| Shingle Installation | 1-2 days field coverage | 2-3 days with detailed flashing |
| Ridge & Ventilation | 3-4 hours finishing | 5-6 hours multiple planes |
| Cleanup & Inspection | Same day final sweep | 1 full day restoration |
| Total On-Site Time | 3-4 consecutive days | 5-7+ days |
| Complete Timeline | 2-3 weeks permit to finish | 3-4 weeks all phases |
Common Homeowner Mistakes During Roof Installations
Well-intentioned property owners sometimes create problems that delay projects or compromise results. Understanding these pitfalls helps you support contractor efficiency while protecting your investment. Most issues stem from miscommunication or unrealistic expectations rather than intentional interference.
Attempting DIY Tear-Off Work
Homeowners occasionally remove old shingles themselves hoping to reduce costs, but this approach creates multiple problems. Amateur tear-off often misses hidden rot or structural damage that professionals would identify and address before covering with new materials. Improper deck protection during DIY removal can allow water infiltration if unexpected rain occurs before contractors arrive to complete the job.
Safety risks multiply without proper equipment, training, and insurance coverage. Falls from roofs cause thousands of serious injuries annually, with homeowners lacking experience and safety gear facing the highest risks. Contractors also may refuse to warranty work over decks they didn’t personally inspect and prepare, eliminating protection if problems develop later.
Ignoring Permit Requirements
Skipping permits to avoid fees and waiting periods creates serious long-term consequences. Building departments can issue stop-work orders and require complete removal of unpermitted work regardless of quality. Property sales get complicated when unpermitted improvements appear in disclosure requirements. Insurance claims for future damage may be denied if companies discover roof replacement occurred without proper approvals.
Poor Staging Area Planning
Restricting contractor access to convenient staging areas forces them to haul materials longer distances, slowing work and increasing costs. Failing to relocate vehicles, boats, or equipment from driveways before scheduled start dates creates delays while crews wait for property owners to clear spaces. Inadequate yard protection allows equipment to rut lawns and damage landscaping that could have been preserved with advance planning.
Skipping Final Inspections and Walkthroughs
Accepting completion without thorough walkthrough inspection allows minor issues to become major problems later. Missing flashing around chimneys, improperly sealed vents, or incomplete cleanup become homeowner responsibilities if you sign off prematurely. Professional contractors welcome detailed inspections since identifying concerns before final payment ensures everyone achieves satisfactory results.
Frequently Asked Questions About Professional Roof Installation
Q: What happens during a typical professional roof installation process?
A: Professional installations follow a structured sequence beginning with permit acquisition and material ordering taking 1-2 weeks. On-site work starts with material delivery and staging, followed by complete tear-off of existing roofing to expose the deck for inspection. Contractors then install ice and water shield, underlayment, flashing, and shingles in that order. Most residential projects require 3-7 days of active construction depending on size and complexity, concluding with cleanup and final inspection.
Q: How long does the tear-off phase typically take?
A: Standard residential tear-off completes in 4-10 hours for homes up to 2,000 square feet with one or two existing roof layers. Larger properties or those with multiple old layers may extend to a full day. This phase exposes underlying problems early so contractors can address structural issues before proceeding with installation. Weather-resistant tarps protect opened areas if work must pause overnight.
Q: Do I need permits for roof replacement in Connecticut or New York?
A: Connecticut requires building permits for replacements affecting more than 25% of roof coverage, while New York regulations vary by municipality. Most communities require permits for complete replacements to verify code compliance including proper ventilation, flashing, and structural adequacy. Application review typically takes 7-14 days, with fees ranging $100-300 depending on location and project scope. Professional contractors usually handle permit applications as part of their service.
Q: What should I expect on the first day of installation?
A: Day one begins with material delivery trucks arriving early to position shingle bundles, underlayment, and flashing near roof access points. Crews set up safety equipment, spread protective tarps over landscaping, and position dumpsters for debris. Tear-off begins mid-morning and continues through afternoon, with old shingles, felt paper, and damaged flashing removed. Tarps protect the exposed deck if installation cannot complete before evening, though professionals avoid leaving roofs vulnerable overnight when possible.
Q: How can I minimize yard and landscape damage during roofing?
A: Designate clear staging areas for materials and dumpsters before crews arrive, preferably on driveways or hard surfaces rather than grass. Request plywood walkways to protect high-traffic lawn areas where workers will repeatedly pass. Daily cleanup removes debris before it gets ground into turf, while tarps catch most falling materials. Schedule installations during dry periods when soil is firm rather than saturated and easily rutted. Most professional contractors include yard restoration in their service, reseeding any damaged areas after completion.
Q: What weather conditions delay roof installation?
A: Rain immediately stops installation since adhesives cannot cure properly and exposed decks risk water damage. High winds above 25 mph create safety hazards and prevent shingles from sealing correctly. Temperatures below freezing affect adhesive strips and make materials brittle and difficult to work with. Connecticut and New York contractors monitor forecasts closely and adjust schedules proactively, typically working spring through fall when conditions remain most stable.
Q: How do I prepare my home interior for roof installation?
A: Clear items stored in attics since contractors may need access for ventilation work or to check for leaks during testing. Remove wall hangings on exterior walls since vibrations from tear-off work can cause items to fall. Consider relocating vehicles from attached garages to prevent car alarms triggered by hammering and equipment noise. Notify household members about expected noise levels during demolition phases so they can plan accordingly, particularly those working from home or caring for infants.
Protecting Your Investment with Professional Installation
Professional roof installations in Connecticut and New York address regional challenges including frost protection, ice dam prevention, and wetland compliance while delivering predictable timelines averaging 1-2 weeks from permit to completion. Understanding the structured process from site preparation through final cleanup helps homeowners prepare properties effectively and set realistic expectations. On-site work typically spans just 3-7 days, with contained staging and daily debris removal minimizing yard impacts that often worry property owners.
The sequence from permit acquisition through comprehensive tear-off, layered protection systems, and quality finishing ensures your new roof handles Northeast weather extremes for decades. While yard disruption concerns are valid, professional contractors use protective measures and efficient scheduling to restore your property quickly after completion. Advance preparation including clear staging areas, relocated vehicles, and trimmed trees facilitates smooth project execution that respects your daily routines.
Licensed contractors bring the expertise, proper insurance, and code knowledge that DIY approaches cannot match. Building code compliance through proper permitting protects your property value and insurance coverage while ensuring work meets manufacturer warranty requirements. Whether you’re planning ahead or responding to damage, partnering with certified professionals transforms a potentially stressful project into a managed process with predictable outcomes.
Just as professional roofing contractors protect your home from the elements, Tri-State Geese Patrol safeguards your property from another common Northeast challenge: Canadian geese damage. For over 11 years, our specially trained border collies have provided humane, effective geese management for commercial and residential properties across Connecticut and New York. If your lawn, pond, or waterfront faces persistent geese problems creating mess and health concerns, our professional canine teams offer cost-effective solutions that work with nature rather than against it. Contact Tri-State Geese Patrol today to learn how our reliable, responsive service can restore your property’s usability and appearance while maintaining the highest standards of wildlife respect.