Installing a New Roof Over an Old One: What CT and NY Homeowners Need to Know
You’ve noticed the missing shingles after last winter’s ice storm, or maybe your home inspector flagged the curling edges during a pre-sale walkthrough. Now you’re watching roofing trucks roll down your Connecticut or New York street, and you’re wondering just how disruptive this whole process will be. Between the noise concerns, the debris you’re picturing scattered across your carefully maintained lawn, and the permit requirements you’ve heard about from neighbors, replacing your existing roof feels like it might turn into a major ordeal. The good news is that modern roofing crews follow a streamlined process designed specifically to minimize disruption, often completing standard residential projects in just one to two days. Whether you’re dealing with Northeast-specific challenges like steep slopes that make your property unique or you’re simply trying to understand whether installing new roofing over your existing layer makes sense, the timeline and process are more manageable than you might expect. Your situation deserves a clear breakdown of what actually happens from the moment that first worker arrives until the final cleanup sweep, so you can plan accordingly and know exactly what to expect.
Key Takeaways
- Standard residential roof replacements in Connecticut and New York typically take 1-2 days: Simple overlay installations on single-story homes with standard asphalt shingles often wrap up in a single day, while full tear-off projects with deck repairs may extend into a second day depending on complexity and weather conditions.
- The tear-off decision significantly impacts your timeline: Overlay installations where new shingles go directly over one existing layer minimize debris and speed up the process, while full tear-offs expose the deck for thorough inspection and repair of frost damage or rot but create more yard disruption during the 4-6 hour removal phase.
- Preparation and permitting happen before crews arrive: Getting your building permit approved through Connecticut or New York state portals, confirming zoning compliance for any layers or slope considerations, and coordinating utility clearances all occur in advance, preventing delays once the actual roofing work begins.
- Installation follows a specific sequence: After any necessary tear-off and deck inspection, crews install ice and water shield underlayment, apply starter strips, nail shingles according to code requirements for snow and ice protection, and finish with ridge caps and flashing designed to prevent ice dams.
- Connecticut and New York permits are required for most projects: Both states mandate building permits for roof replacements, particularly when deck inspection or structural work is involved, with typical review periods of 5-30 days and fees ranging from $100-500 based on project valuation and local jurisdiction requirements.
- Yard cleanup happens the same day in most cases: Professional roofing contractors use protective tarps, coordinate dumpster placement to minimize grass damage, perform magnetic sweeps for stray nails, and haul away debris by the end of the first day, addressing the common concern about prolonged property disruption.
Understanding the Roof Replacement Process in CT and NY
Professional roofing installations in Connecticut and New York prioritize efficiency while adapting to the unique challenges that Northeast weather presents. The region’s combination of heavy snow loads, ice dam potential, and frost heaving means that every roofing project must balance speed with thoroughness, particularly when it comes to deck preparation and underlayment installation.
The basic sequence for replacing an existing roof follows a logical progression, whether you’re doing a simple overlay or a complete tear-off and rebuild. Contractors start by obtaining necessary permits and coordinating with local building departments, then move through site preparation, material removal or overlay prep, deck inspection and repair if needed, installation of new materials, and finally cleanup and inspection. What makes Connecticut and New York installations distinct is the emphasis on frost protection measures and proper underlayment to handle the region’s challenging winter conditions.
The choice between overlay and tear-off significantly affects your project timeline and the disruption you’ll experience. Overlay projects, where permitted by local code, can often be completed in a single day on standard residential homes because they skip the debris-intensive removal phase. Full tear-offs require more time for proper disposal and deck inspection but provide the opportunity to address hidden problems before they escalate.
Local Roof Environment and Process Needs
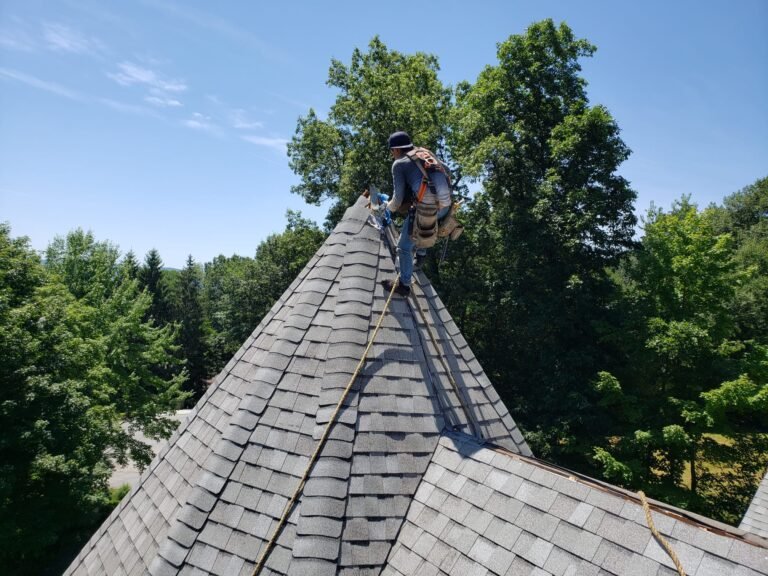
Connecticut and New York roofing projects must account for several regional factors that don’t apply in milder climates. Steep roof pitches common in Colonial and Cape Cod style homes require additional safety equipment and can slow down installation, while wooded properties may need branch trimming to provide adequate access for crews and equipment.
Frost heaving creates unique challenges for roof structures in this region. The ground freezes to depths of 36-48 inches during winter months, which can affect foundation settlement and create stress points where roofs connect to exterior walls. This makes the initial deck inspection particularly important, as contractors need to verify that the existing structure can handle new materials without flexing or separating at critical junctions.
The permit process in Connecticut requires verification of how many existing shingle layers are present, what the roof pitch measures, and whether the deck shows any signs of damage or deterioration. New York follows similar protocols through its state building code requirements. These upfront checks may feel like bureaucratic hurdles, but they serve to catch potential problems before crews arrive and start work, ultimately saving you time and money.
Zoning considerations rarely affect standard roof replacements since you’re not expanding your home’s footprint, but properties near wetlands or in historic districts may face additional review requirements. Connecticut’s inland wetlands regulations and New York’s 100-foot wetlands buffer zones typically don’t apply to roof-only projects, but it’s worth confirming with your local zoning office if you live in a sensitive area.
National vs. CT/NY Installation Timelines
Standard roofing timelines across the United States provide a useful baseline, but Connecticut and New York projects typically extend slightly longer due to regional code requirements and weather considerations. A straightforward overlay on a 1,500 square foot ranch-style home might take 6-8 hours in moderate climates, but the same project in the Northeast often stretches to a full day or slightly longer once you factor in required inspections and enhanced underlayment installation.
Weather holds represent one of the most common timeline extensions in Connecticut and New York. Roofing work cannot proceed safely during rain, and exposed roof decks must be protected from moisture to prevent wood rot and structural damage. Spring and fall typically offer the most reliable weather windows, while summer thunderstorms and winter conditions can create scheduling challenges even for well-planned projects.
Typical Timeline Ranges by Roof Size
Project duration varies based on several factors beyond just square footage, including roof complexity, number of existing layers, pitch steepness, and the extent of any required repairs. However, these general ranges can help you plan for the disruption period:
Small homes (1,000-1,500 square feet): Overlay installations typically complete in 6-10 hours, while tear-off projects may extend to 1-1.5 days. These homes usually feature simple gable or hip roof designs with minimal valleys or dormers, allowing crews to work efficiently through the installation sequence.
Medium homes (1,500-2,500 square feet): Standard for many Connecticut and New York suburban properties, these projects generally take 1-2 full days depending on complexity. Tear-off and debris removal alone can consume 4-6 hours on these homes, with the remaining time dedicated to deck prep and new material installation.
Large homes (2,500+ square feet): Multi-story homes with complex roof lines, multiple chimneys, or significant dormer configurations often require 2-3 days for complete replacement. The additional time accounts for safety measures on steep or high sections, careful flashing around numerous penetrations, and the logistical challenges of moving materials across larger roof areas.
These timelines assume good weather and no major surprises during deck inspection. Discovering rotted sheathing, failed rafters, or inadequate ventilation can add anywhere from a few hours to an additional day depending on the extent of repairs needed.
Day-by-Day Breakdown Models
Understanding what happens during each phase helps set realistic expectations for the disruption you’ll experience. Most residential projects in Connecticut and New York follow one of two basic timeline models.
Single-day overlay projects move through the following sequence: crews arrive around 7-8 AM and spend 1-2 hours setting up safety equipment, laying protective tarps, and staging materials. The actual overlay work, including starter strip installation, shingle application, ridge cap placement, and flashing installation, typically requires 4-6 hours on standard homes. Final cleanup, including magnetic sweeps for nails and debris removal, wraps up by early evening, usually around 5-6 PM. Your yard experiences peak disruption during the morning setup and material delivery, but protective tarps minimize damage to landscaping.
Two-day tear-off projects split the work differently. Day one focuses on removal and preparation, with crews spending the morning hours on complete tear-off that exposes the deck for inspection. This phase generates the most noise and debris, with materials being tossed into dumpsters positioned strategically to minimize lawn damage. Afternoon work on day one often includes deck repairs, underlayment installation, and possibly the first sections of new shingles if time permits. Day two completes the shingle installation, addresses all flashing and ventilation details, and includes final cleanup and inspection. This split approach allows crews to properly protect any exposed deck overnight with tarps and ensures adequate time for thorough repairs.
Key Steps in the Roof Replacement Process
Every roof replacement follows a logical sequence designed to ensure proper installation and long-term performance. Understanding each phase helps you know what to expect and when to be available for important decisions or approvals during the project.
The process balances code compliance with practical efficiency, particularly for asphalt shingle installations that represent the majority of residential projects in Connecticut and New York. Whether you’re doing an overlay or complete tear-off, certain steps remain consistent across all projects, while others adapt based on your specific roof condition and local requirements.
Site Preparation and Layout
Professional roofing crews begin every project with careful preparation that protects your property while ensuring worker safety. This phase typically takes 1-2 hours and sets the stage for smooth execution of the remaining work.
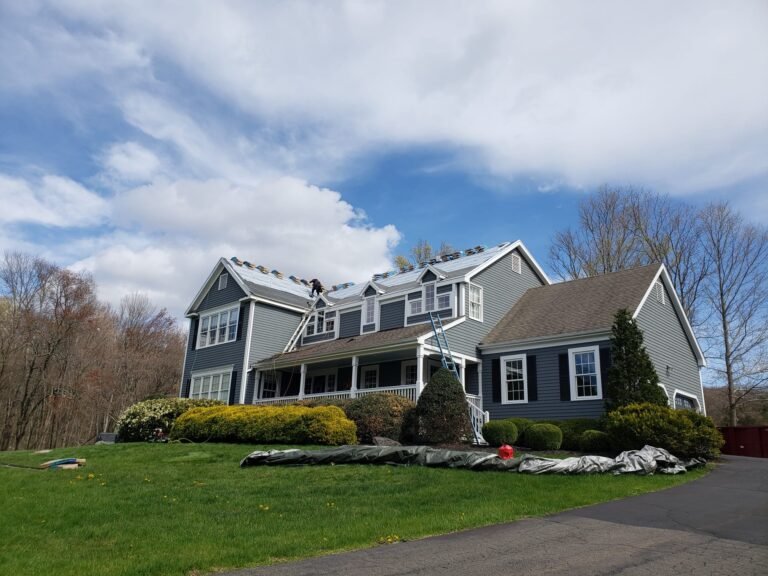
Tarps and plywood boards go down first to protect your landscaping, walkways, and any ground-level features like air conditioning units or delicate plantings. Crews position dumpsters or debris chutes strategically to minimize the distance materials must be carried, which speeds up the tear-off process while reducing the risk of debris damaging your yard. You’ll notice safety equipment going up during this phase, including roof jacks, scaffolding for steep sections, and perimeter warning systems to keep people away from fall zones.
Permit documentation gets posted visibly on-site as required by Connecticut and New York regulations, usually in a front window or attached to the dumpster. This display confirms that all necessary approvals are in place and allows building inspectors to verify compliance during their site visits.
Material staging happens during this phase as well, with bundles of shingles, rolls of underlayment, and boxes of fasteners positioned for easy access. On steep roofs, crews may use rope and pulley systems or even motorized lifts to move materials up to the working area safely. Proper staging prevents repeated trips up and down ladders, which improves both safety and efficiency.
Tear-Off, Deck Inspection, or Overlay Prep
The next phase diverges significantly depending on whether you’re doing an overlay or complete tear-off. This decision should have been made during the planning and permitting stage based on local code requirements, the condition of your existing roof, and the number of shingle layers currently in place.
For overlay installations, prep work is relatively minimal. Crews remove any loose or damaged existing shingles, clean valleys and edges to ensure proper adhesion, and install additional drip edge if needed. This phase typically takes 2-3 hours on standard homes and generates minimal debris. Connecticut and New York codes allow overlays only when you have a single existing layer of asphalt shingles in good condition, which means this option isn’t available to every homeowner.
For complete tear-offs, this phase represents the most disruptive part of the project but also the most important for long-term roof performance. Crews systematically remove all existing shingles, underlayment, and often the old drip edge, working section by section to maintain safety. Materials get tossed directly into dumpsters or debris chutes, creating significant noise for 4-6 hours on most residential projects.
Once the deck is fully exposed, a thorough inspection follows. Crew members walk the entire roof surface looking for soft spots, rot, damaged sheathing, or structural issues. Connecticut and New York’s freeze-thaw cycles can cause particular damage to roof decks over time, with ice dams creating moisture infiltration that rots the underlying wood. Any compromised sheathing gets replaced at this stage, and joints between deck panels get properly sealed to prevent air infiltration and moisture problems.
This inspection phase often reveals issues that weren’t visible from below or during initial estimates. Finding and fixing these problems before new materials go on prevents callbacks and ensures your new roof performs as expected for its full lifespan.
Underlayment, Shingles, and Flashing
With a clean, inspected deck ready for new materials, installation proceeds in a specific sequence designed to create proper water shedding and protection against ice dams.
Underlayment installation begins with ice and water shield applied to all eaves, valleys, and around any roof penetrations like chimneys or vent pipes. Connecticut building codes require this protective membrane to extend at least 6 inches past the interior wall line to prevent ice dam damage during winter months. Valleys get double protection with ice and water shield running the full length, overlapped by at least 6 inches at all seams. The remainder of the deck gets covered with standard synthetic underlayment, which provides a secondary water barrier and helps protect the deck if shingles are damaged by wind or impact.
Starter strip installation comes next, running along all eaves and rakes to provide a proper seal for the first course of shingles. This often-overlooked detail prevents wind-driven rain from getting under the shingle edges and ensures the characteristic tab pattern looks correct from the ground.
Shingle application proceeds from bottom to top, with each course overlapping the one below according to manufacturer specifications. Crews nail shingles in specific patterns required by building codes and warranty terms, typically using 4-6 nails per shingle depending on roof pitch and wind exposure. On steep roofs common in Connecticut and New York, additional fasteners may be required to meet code requirements for high wind zones. The process moves methodically across the roof, with experienced crews maintaining straight lines and proper exposure for a professional appearance.
Ridge cap and flashing installation completes the job. Ridge caps get special attention since they represent a common failure point in high winds, with proper nailing patterns and adequate overlap essential for long-term performance. Flashing around chimneys, skylights, and vent pipes receives careful detail work, often incorporating ice and water shield and metal components to create watertight seals. Proper flashing installation is critical for ice dam prevention in Connecticut and New York, where winter conditions test every weak point in a roofing system.
Additional Steps for Complex Installs
Standard residential roofs occasionally present challenges that require additional time, specialized techniques, or extra materials to ensure proper installation. These complications don’t necessarily mean problems, they simply reflect the reality that not every home features a simple gable roof with easy access and moderate pitch.
Understanding which factors might extend your timeline helps you set realistic expectations and avoid surprise delays. Most contractors identify these issues during the initial inspection and estimate, but occasionally challenges only become apparent once work begins.
Handling Slopes, Wetlands, and Multi-Layer
Steep pitches common on Colonial and Victorian homes in Connecticut and New York require additional safety measures and slower work paces. Roof jacks and scaffolding go up to provide secure footing, and materials often need to be secured or racked in specific ways to prevent sliding. Shingle installation on steep roofs requires more precise nailing to ensure proper holding power, and workers must take frequent breaks to manage the physical demands of working at sharp angles. These factors can add 25-50% to the timeline for steep sections compared to moderate slopes.
Wetlands considerations rarely affect standard roof replacements since you’re not expanding your footprint or disturbing soil, but properties in sensitive areas should verify clearance before work begins. New York’s freshwater wetlands program establishes 100-foot buffer zones where certain activities require permits, though roof replacement on existing structures typically falls outside these restrictions. Connecticut’s inland wetlands regulations function similarly, focusing on ground disturbance rather than aerial work. If your property includes wetlands or you’re near designated sensitive areas, confirming that your roof replacement doesn’t require additional environmental permits can prevent mid-project shutdowns.
Multiple existing shingle layers trigger mandatory tear-off in both Connecticut and New York. Building codes in both states prohibit more than two total layers of roofing, which means homes with two existing layers must have everything removed before new shingles can be installed. This requirement exists for good reason, as excessive weight can stress roof structures beyond their design limits, particularly when you factor in heavy snow loads. Multi-layer tear-offs generate significantly more debris, require longer dumpster rental periods, and add roughly half a day to a full day to project timelines compared to single-layer removal.
Discovering that your home has two existing layers when only one was expected represents one of the more common surprises during roof replacements. Sometimes layers are difficult to count from the ground, or previous owners may have installed an overlay without proper permits. Once this situation is identified, there’s no shortcut since code compliance requires complete removal before proceeding.
Finishing Touches and Yard Restoration
The final phase of any roof replacement focuses on details that ensure proper performance and restore your property to its pre-construction condition. These steps may seem minor compared to the main installation work, but they significantly impact your long-term satisfaction with the project.
Ventilation verification ensures that your attic has adequate air flow to prevent moisture buildup and ice dam formation during winter months. Crews check that ridge vents, soffit vents, and any gable vents remain unobstructed and functioning properly. Proper ventilation extends shingle life, reduces cooling costs in summer, and prevents the moisture accumulation that leads to mold growth and wood rot.
Gutter alignment and cleaning often gets addressed during roof replacement since crews already have access to all roof edges. Gutters may have shifted slightly during tear-off or may have been misaligned for years, causing water to overflow and potentially damage fascia boards or foundation areas. Taking time to properly slope gutters and secure them firmly prevents water intrusion problems that could undermine your new roof investment.
Debris removal and magnetic sweeps represent the most visible part of final cleanup. Crews haul away all roofing materials, packaging, and construction waste, typically completing this work the same day as installation on standard projects. Multiple passes with magnetic sweepers pick up stray nails that could puncture tires or injure children and pets playing in the yard. Professional contractors take pride in leaving properties cleaner than they found them.
Yard restoration addresses any areas where equipment or foot traffic has compressed grass or disturbed landscaping. While protective tarps prevent most damage, high-traffic areas near ladder placement or material staging zones sometimes need attention. Contractors may add topsoil to low spots or scatter grass seed in bare patches, though full restoration typically becomes the homeowner’s responsibility once the project is complete. Most yard damage is minimal when proper precautions are taken, and any disturbed areas usually recover within a few weeks during the growing season.
Permits, Utilities, and Regulations in CT and NY
Legal requirements for roof replacement in Connecticut and New York exist to protect homeowners, ensure proper installation, and maintain property values across neighborhoods. While permit processes may feel bureaucratic, they serve important purposes by requiring inspections that catch problems before they become expensive failures.
Understanding what’s required before crews arrive prevents mid-project delays and potential fines. Both states take building code enforcement seriously, with penalties for unpermitted work that can include stop-work orders, fines, and requirements to remove non-compliant installations.
Zoning and Utility Coordination
Building permits are required for most roof replacements in Connecticut and New York, particularly when work involves deck inspection, structural repairs, or full tear-offs. The permit process requires submission of basic project details including the type of shingles being installed, number of existing layers, roof pitch and square footage, and contractor licensing information. Fees typically range from $100-500 based on project valuation, with review periods spanning 5-30 days depending on the complexity and local department workload.
Connecticut homeowners submit permit applications through their local building department or online via municipal portals. The review process verifies compliance with the Connecticut State Building Code, which incorporates International Residential Code standards with state-specific amendments for snow loads and other regional factors. New York follows a similar structure through local code enforcement offices, with some jurisdictions allowing online submission while others require in-person applications.
Zoning approval is typically not required for standard roof replacements since you’re not changing your home’s footprint, height, or use. However, homes in historic districts or with previous zoning variances should verify that roof work doesn’t trigger additional review requirements. Properties near wetlands or in special overlay districts may face extra scrutiny even for roof-only projects, though this is relatively uncommon.
Utility coordination becomes necessary if your roof replacement involves moving or working near electrical service drops, cable lines, or other overhead utilities. Calling 811 before any work begins is mandatory in both Connecticut and New York to locate underground utilities, though roof projects rarely involve ground disturbance that would damage buried lines. If your electrical service entrance is attached to a roof-mounted mast or if cable and phone lines run across roof surfaces, the utility company may need to temporarily disconnect and reconnect these services to allow safe roof work.
This coordination should happen during the planning phase, as some utilities require several days’ notice for service modifications. Working around energized electrical lines requires specific clearances and safety procedures that professional contractors understand, but homeowners should be aware that utility issues can delay project starts if not addressed in advance.
What Homeowners Should Prepare For and Do
Your involvement in the roof replacement process requires relatively little hands-on participation once you’ve selected a contractor and obtained necessary permits, but understanding what to expect during each phase helps you prepare appropriately and avoid surprises.
Most disruptions are temporary and manageable with basic planning. Knowing when noise will be loudest, when access limitations might affect your daily routine, and what decisions might require your input allows you to schedule accordingly and minimize stress during the project.
Daily Expectations During Install
Noise levels peak during tear-off phases when workers are removing old materials and during shingle installation when nail guns fire repeatedly. Morning hours typically see the highest activity levels as crews work to maximize productive daylight time, with work often beginning around 7-8 AM. If you work from home or have young children who nap, planning for this disruption can make the experience much more manageable.
Dumpster and equipment placement affects driveway access and street parking for one to two days on most projects. Contractors position these items to minimize inconvenience while maintaining safe and efficient work zones, but you may need to park on the street or coordinate vehicle access during peak work hours. Delivery trucks bringing shingle bundles and other materials add to the traffic around your property during the morning setup phase.
Access restrictions mean you should avoid certain areas during active roofing work. Staying clear of the immediate work zone protects both you and the workers, while falling debris can occur even with experienced crews following proper safety protocols. Keep children and pets indoors or in fenced areas away from the work zone, and plan to use different entries if ladder placement blocks your main door.
Decision points during the project are relatively few if planning was thorough, but occasionally crew members will need to consult with you about issues discovered during deck inspection or about color matching for flashing and trim details. Being available by phone during work hours allows contractors to get quick answers without delaying the project timeline.
Final walkthrough and approval happens once installation is complete and cleanup is finished. Your contractor should guide you around the property to show completed work, explain maintenance requirements, and verify your satisfaction before requesting final payment. This is your opportunity to ask questions, point out any concerns, and ensure all contract terms have been met.
Tips to Minimize Disruptions
Secure outdoor items before crews arrive to prevent damage from falling debris or accidental contact with equipment. Move grills, patio furniture, planters, and decorative items away from the house perimeter. Secure or remove anything mounted on exterior walls near the roof line, including hanging baskets, flags, or light fixtures that could be damaged during work.
Schedule around the project if possible by planning to be away during the noisiest phases or arranging for children and pets to spend time elsewhere during peak activity hours. While not necessary, some homeowners find it less stressful to be at work or running errands during tear-off and disposal rather than listening to the construction noise.
Protect interior spaces by removing pictures and fragile items from walls that share attic spaces with the roof, as vibrations from foot traffic and equipment can cause items to shift or fall. Some homeowners report dust infiltration through light fixtures or fans connected to attic spaces, so covering valuable furniture in rooms directly below roof work areas provides extra protection.
Communicate special concerns to your contractor before work begins, including any areas of your property that need extra care, pets that may be anxious about noise and strangers, or scheduling constraints around your work-from-home hours or other commitments. Professional contractors appreciate knowing about these factors in advance and can often adjust their approach to accommodate reasonable requests.
Verify recycling and disposal plans to ensure your contractor properly handles old roofing materials. Connecticut requires specific disposal or recycling procedures for asphalt roofing shingle waste, with approved facilities accepting materials for beneficial reuse in paving applications and other construction projects. Confirming that your contractor follows proper disposal procedures ensures compliance with environmental regulations and supports sustainable construction practices.
Process Comparison Table: Overlay vs. Tear-Off Roof Install in CT/NY
| Phase | Overlay (Simple) | Tear-Off (Complex) |
|---|---|---|
| Prep and Safety | 1-2 hours for tarps, material staging, safety equipment setup | 2-4 hours including dumpster positioning, expanded protection zones, additional safety measures for debris removal |
| Removal and Deck | Skip major removal or light prep work taking 2 hours to clean and prepare for overlay | 4-6 hours for complete material removal, exposing full deck for thorough inspection and repair |
| Install and Flash | 4-6 hours for underlayment, shingles, and flashing on prepared surface | 6-8 hours including deck repairs, enhanced underlayment, full shingle installation with detailed flashing work |
| Total Timeline | 1 day for most residential homes under 2,000 square feet | 1-2 days depending on repair needs, weather conditions, and roof complexity |
This comparison assumes standard residential projects on homes with relatively simple roof lines and moderate pitches. Complex roofs with multiple dormers, steep sections, or extensive repair needs may extend these timelines regardless of whether you choose overlay or tear-off approaches.
Common Mistakes Homeowners Make During Roof Replacement
Even with professional contractors handling the installation work, homeowners can make decisions that complicate projects or lead to problems down the road. Understanding these common pitfalls helps you avoid them.
Skipping or delaying permit applications to save money or time almost always backfires. Building departments can issue stop-work orders when they discover unpermitted roofing projects, which forces contractors to halt work until proper applications are submitted and approved. This delay costs more than the original permit fee, and some jurisdictions impose penalty fees for after-the-fact permit applications. Worse, unpermitted work can complicate home sales, insurance claims, and warranty coverage.
Ignoring existing layer limits by approving overlay installations when code requires tear-off creates liability and performance problems. Some contractors may suggest overlays to reduce their costs and offer lower bids, but exceeding the permitted number of shingle layers violates building codes and can void manufacturer warranties. The excess weight also stresses roof structures, particularly problematic in Connecticut and New York where snow loads already push design limits.
Failing to protect landscaping by not insisting on tarps and protection boards can result in damaged shrubs, compacted soil, and dead grass that takes months to recover. While contractors should automatically provide this protection, homeowners who fail to verify these measures before work begins may find themselves dealing with unnecessary yard restoration expenses.
Rushing final cleanup inspections instead of thoroughly walking the property with your contractor can mean missing problems that become difficult to address later. Stray nails, incomplete flashing details, or minor damage to siding or trim are much easier to fix during the final walkthrough than after the contractor has packed up and left. Taking time to review all work carefully protects your investment.
Choosing contractors solely on price without verifying licensing, insurance, and references often leads to substandard work that fails prematurely or doesn’t meet code requirements. Connecticut requires home improvement contractors to hold state registration, while New York mandates licensing through local jurisdictions. Contractors who can’t provide proof of proper credentials should be avoided regardless of their bid price.
Preparing Your Property for Roof Replacement in CT/NY
Taking a few simple steps before your scheduled installation date helps ensure the project proceeds smoothly and protects your property from potential damage during construction.
Call 811 at least three business days before work begins to have underground utilities marked, even though roof work rarely involves ground excavation. This free service protects you and the contractors from accidentally damaging buried electric, gas, water, or telecommunications lines if any ground work becomes necessary. Utility coordination in advance prevents delays and potential safety hazards.
Trim overhanging branches that could interfere with roof access or damage new materials during installation. Branches rubbing against shingles accelerate wear, and falling limbs during storms can puncture roofing materials. Address these issues before crews arrive to avoid mid-project delays while waiting for tree services.
Clear attic access so inspectors and contractors can easily verify ventilation, check for leaks during initial assessment, and ensure proper airflow after installation completes. Move stored items away from attic hatches and ensure the access point is clearly marked and accessible.
Move vehicles from the driveway and garage areas where dumpsters and equipment will be positioned. Plan alternative parking for the duration of the project, typically one to two days, and communicate with neighbors if street parking will be affected.
Protect valuables inside by moving fragile items away from walls and covering furniture in rooms directly below the roof work area. While quality contractors work carefully to minimize vibrations and debris infiltration, taking these simple precautions provides extra peace of mind.
Document existing conditions by taking photos or videos of your roof, yard, and surrounding property before work begins. This documentation proves valuable if disputes arise about damage claims or if you need to file insurance paperwork related to the roof replacement project.
Frequently Asked Questions About Replacing Existing Roof
Q: What is the typical roof replacement process in Connecticut and New York?
A: The standard process begins with permit approval, followed by site preparation with protective tarps and safety equipment. Crews then either prepare the surface for overlay or perform a complete tear-off to expose the deck for inspection and repairs. After deck work is complete, installation proceeds with ice and water shield underlayment, standard underlayment, starter strips, shingles, and finally ridge caps and flashing. Cleanup and debris removal typically happen the same day, with most residential projects completing in one to two days depending on size and complexity. Final inspection by the building department verifies code compliance before the project is considered complete.
Q: Can you install a new roof over an old one in CT or NY?
A: Yes, both Connecticut and New York building codes allow overlay installations under specific conditions. You can install new shingles over one existing layer if the current roof is in sound condition, properly attached, and not showing signs of significant damage or deterioration. Any home with two existing layers must have all materials removed before new installation since codes prohibit more than two total layers of roofing. Overlay installations save time and money by eliminating tear-off work, but they prevent thorough deck inspection and can hide underlying problems that may cause issues later.
Q: Are permits required for roof replacement in Connecticut and New York?
A: Yes, both states require building permits for most roof replacement projects, particularly when work involves deck inspection, structural repairs, or changes to roofing materials. Homeowners or contractors must submit applications to local building departments showing compliance with state building codes, including details about shingle type, number of layers, and roof specifications. Permit fees range from $100-500 depending on project value and jurisdiction, with review periods typically taking 5-30 days. Inspections during and after installation verify that work meets code requirements for the region’s snow loads, ice dam protection, and other safety standards.
Q: How long will my yard be torn up during a roof replacement?
A: Professional contractors use protective tarps and careful material handling to minimize yard disruption, with most impact limited to the actual installation period of one to two days. The messiest phase occurs during tear-off when old materials are removed, typically lasting 4-6 hours and concentrated in the morning of day one. Dumpsters and equipment may affect driveway access during this period, but debris gets hauled away the same day on standard residential projects. Contractors perform magnetic sweeps to collect stray nails and restore tarped areas immediately after work completes, leaving your yard fully usable by the evening of the final work day.
Q: How should I prepare for a roof replacement?
A: Start by obtaining your building permit through your local jurisdiction, which should happen before the scheduled installation date to avoid delays. Secure or move outdoor items like furniture, grills, and decorations away from the house perimeter where they could be damaged by falling debris. Clear attic access points so contractors and inspectors can verify ventilation and check for issues. Move vehicles from areas where dumpsters and equipment will be positioned, and plan for alternative parking during the one to two day project timeline. Communicate any special concerns about pets, noise sensitivity, or valuable landscaping to your contractor before work begins so they can adjust their approach accordingly.
Q: What happens if problems are discovered during deck inspection?
A: When contractors expose the roof deck during tear-off, they perform a thorough inspection looking for soft spots, rot, damaged sheathing, or structural issues common in Northeast homes due to ice dams and freeze-thaw cycles. Any compromised materials must be replaced before new roofing can be installed, which may extend the project timeline by several hours to a full day depending on the extent of damage. Reputable contractors communicate these findings immediately and provide pricing for necessary repairs. While discovering unexpected problems can be frustrating, addressing them during roof replacement prevents much more expensive failures later and ensures your new roof performs properly for its full expected lifespan.
Final Thoughts
Replacing your existing roof in Connecticut or New York follows a well-defined process designed to minimize disruption while ensuring compliance with regional building codes and weather protection requirements. From the initial permit application through final cleanup and inspection, professional contractors work systematically to deliver quality installations in just one to two days for most residential properties. Understanding each phase from site preparation through tear-off or overlay, deck inspection, material installation, and finishing touches helps you set realistic expectations and prepare your property appropriately. The combination of protective measures like tarps and careful debris management with efficient work sequencing means your yard experiences peak disruption for just a few hours, with full restoration typically complete by the end of the installation day.
The investment you make in proper roof replacement protects your home’s structural integrity, prevents moisture damage from ice dams and heavy snow, and maintains property value in competitive Connecticut and New York real estate markets. Following regional code requirements for underlayment, ventilation, and snow load capacity ensures your roof performs reliably through decades of Northeast weather extremes. Taking time to verify contractor credentials, obtain proper permits, and understand the installation sequence positions you for a successful project that delivers lasting value and peace of mind.
For over 25 years, American Quality Roofing & Siding has helped Connecticut homeowners protect their properties with superior roofing installations that meet the highest standards for quality and code compliance. Our factory certifications from GAF Materials Corporation and CertainTeed, combined with our A+ Better Business Bureau rating, demonstrate our commitment to excellence in every project we undertake. We understand the unique challenges that Connecticut’s weather presents, from heavy snow loads to ice dam prevention, and we bring this local expertise to every roof replacement we perform. Our comprehensive warranty coverage and transparent pricing ensure you know exactly what to expect from start to finish. Contact us today at (203) 470-0974 for a free consultation, and let our licensed, insured team (CT #HIC 0633301) show you why Connecticut families have trusted us for more than two decades to protect their most important investment.